
Figure 5.8 Hyperbolic plane with r » 4 cm
2. How to Crochet the Hyperbolic Plane
Once you have tried to make your annular hyperbolic plane from paper annuli you will certainly realize that it will take a lot of time. Also, later you will have to play with it carefully because it is fragile and tears and creases easily — you may want just to have it sitting on your desk. But there is another way to get a sturdier model of the hyperbolic plane, which you can work and play with as much as you wish. This is the crocheted hyperbolic plane.
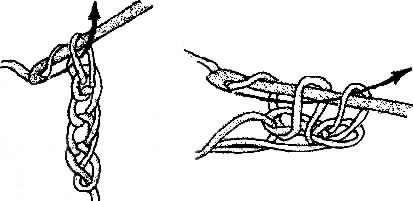
In order to make the crocheted hyperbolic plane you need just very basic crocheting skills. All you need to know is how to make a chain (to start) and how to single crochet. That's it! Now you can start. See Figure 5.3 for a picture of these stitches, and see their description in the list below.
Note: When making those models, hooks should be smaller size then you would normally use for the yarn (or what is on those directions on the skein) - that way you can make your model tight which is crucial. Size of hooks really depends on each person - the models below were all completed with the same hook which is small -N0.2 or No.3.
a b
Figure 5.3 Crochet stitches for the hyperbolic plane
First you should choose a yarn that will not stretch a lot. Every yarn will stretch a little but you need one that will keep its shape. Now you are ready to start the stitches:
Crocheting will take some time but later you can work with this model without worrying about destroying it. The completed product is pictured in Figure 5.4.
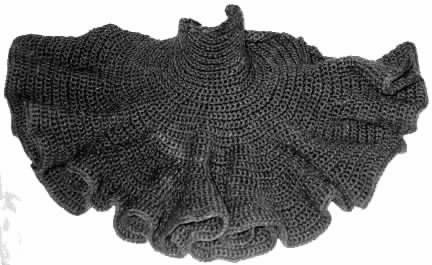
Figure 5.4 A crocheted annular hyperbolic plane
Hyperbolic Planes of Different Radii (Curvature)
Note that the construction of a hyperbolic plane is dependent on r (the radius of the annuli), which is often called the radius of the hyperbolic plane. As in the case of spheres, we get different hyperbolic planes depending on the value of r. In Figures 5.8–5.10 (see next page) there are crocheted hyperbolic planes with radii approximately 4 cm, 8 cm, and 16 cm. The pictures were all taken from approximately the same perspective and in each picture there is a centimeter rule to indicate the scale.
Note that as r increases the hyperbolic plane becomes flatter and flatter (has less and less curvature). For both the sphere and the hyperbolic plane as r goes to infinity they both become indistinguishable from the ordinary flat (Euclidean) plane. Thus, the plane can be called a sphere (or hyperbolic plane) with infinite radius. In Chapter 7, we will define the "Gaussian Curvature" and show that it is equal to 1/r2 for a sphere and -1/r2 for a hyperbolic plane.
Figure 5.8 Hyperbolic plane with r » 4 cm
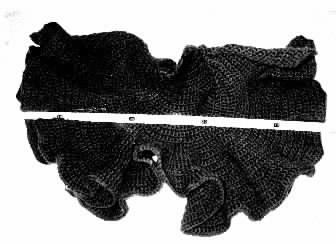
Figure 5.9 Hyperbolic plane with r » 8 cm
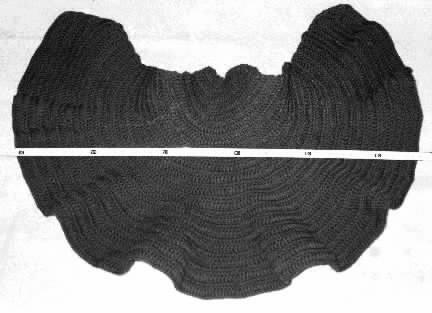
Figure 5.10 Hyperbolic plane with r » 16 cm